From: https://datatofish.com/add-julia-to-jupyter/

In this short post, I’ll show you the steps to add Julia to Jupyter Notebook from scratch.
Steps to add Julia to Jupyter Notebook
Step 1: Download and Install Julia
To start, download Julia for your operating system. In my case, I downloaded Julia for 64-bit Windows:

Follow the instructions to complete the installation on your system.
Step 2: Open the Julia Command-Line
Next, open the Julia command-line, also known as the REPL (read-eval-print-loop):

You would then see the following screen:

Step 3: Add Julia to Jupyter Notebook
In order to add Julia to Jupyter Notebook, you’ll need to type the following command and then press ENTER:
using Pkg

Then, type this command and then press ENTER:
Pkg.add("IJulia")

You’ll have to wait a minute or so for the installation to complete…

Step 4: Download and Install Anaconda
If you haven’t already done so, download the Anaconda Distribution for your operating system. Once you are done with the installation, click on the Anaconda Navigator:

From the Anaconda Navigator, you’ll be able to launch Jupyter Notebook by clicking on the Launch button within the Jupyter box:

Step 5: Create a new Notebook
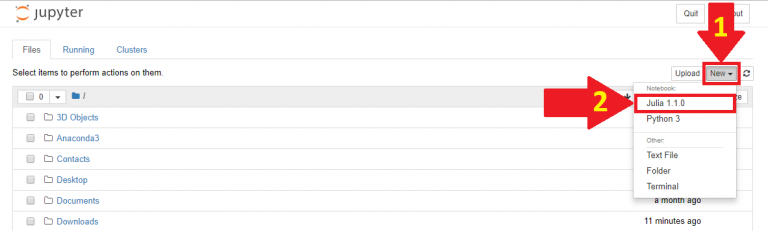
To create a new Notebook with Julia:
- Click on New
- Then, select Julia from the drop-down list
Step 6: Write your Code
For the final step, write your code. For example, here is a simple code to print “Hello World” using Julia:
println("Hello World")
Click on Run to execute your code:

The phrase, Hello World, would be printed as follows:

