
How you can deploy your MNIST model in production environment
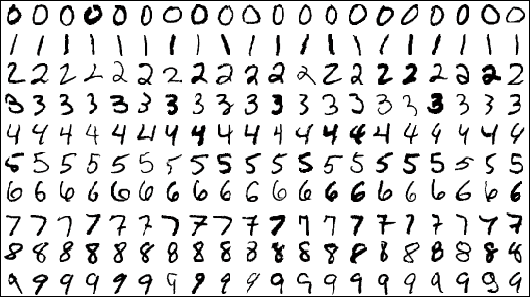
MNIST Dataset is a hello world dataset for most of the ML Enthusiast likes us. At some point everyone who has started their journey in this field or willing to start will come across this dataset and get their hands on for sure.
It is a good dataset for people who want to try learning techniques and pattern recognition methods on real-world data while spending minimal efforts on preprocessing and formatting. — Yann LeCun
What are we building?
In this post i am going to write about how everyone who have completed MNIST can deploy there trained model as a beautiful web application in production environment using Django and Heroku.
Prerequisites
You should have basic knowledge on:
- Python programming language
- Django — Web Application Framework
- Heroku — Platform As a Service (Optional: You will learn how to use it in this post)
and you should have a Keras based model file of MNIST;or you can get started on MNIST right now with this Jupyter Notebook file.
Getting your Backend Ready
First thing first, lets install Django using CMD or bash terminal; if you have not done it already.
If you do not have prior experience in Django, There are a lot of free resources available online. Please consider looking at it. It’s an awesome framework for building Web Apps using Python. There is nothing to lose.
Staring project

pip install django
This will install Django for you and you will have access to Django CLI for creating your project folder.
django-admin startproject digitrecognizer
I am going to name my project digitrecognizer you can name it as you like. Once you have done that you will be presented with a folder with some files inside it.
lets create our new app main inside that folder using mange.py cli.
python manage.py startapp main
This will create new app named main for you. Now we can write our main codes inside views.py file.
Code part
Lets write some code in views.py file:
## Views.py
from django.shortcuts import render
from scipy.misc.pilutil import imread, imresize
import numpy as np
import re
import sys
import os
sys.path.append(os.path.abspath("./model"))
from .utils import *
from django.http import JsonResponse
from django.views.decorators.csrf import csrf_exempt
global model, graph
model, graph = init()
import base64

OUTPUT = os.path.join(os.path.dirname(__file__), 'output.png')

from PIL import Image
from io import BytesIO

def getI420FromBase64(codec):
    base64_data = re.sub('^data:image/.+;base64,', '', codec)
    byte_data = base64.b64decode(base64_data)
    image_data = BytesIO(byte_data)
    img = Image.open(image_data)
    img.save(OUTPUT)

def convertImage(imgData):
    getI420FromBase64(imgData)

@csrf_exempt
def predict(request):

imgData = request.POST.get('img')

convertImage(imgData)
    x = imread(OUTPUT, mode='L')
    x = np.invert(x)
    x = imresize(x, (28, 28))
    x = x.reshape(1, 28, 28, 1)
    with graph.as_default():
        out = model.predict(x)
        print(out)
        print(np.argmax(out, axis=1))
        response = np.array_str(np.argmax(out, axis=1))
        return JsonResponse({"output": response})

It looks like a lot, but it is not! 😂 trust me.
Lets break it down
At the very beginning of the code, we are importing every required libraries and modules.
Imports
Every imports are self explanatory and also i have commented out the important sections, consider looking at it.
from django.shortcuts import render
from scipy.misc.pilutil import imread, imresize
import numpy as np
import re
import sys

## Apending MNIST model path
import os
sys.path.append(os.path.abspath("./model"))

## custom utils file create for writing some helper func
from .utils import *

from django.http import JsonResponse
from django.views.decorators.csrf import csrf_exempt

## Declaring global variable
global model, graph

## initializing MNIST model file (It comes from utils.py file)
model, graph = init()

import base64
from PIL import Image
from io import BytesIO

## Declaring output path to save our image

OUTPUT = os.path.join(os.path.dirname(__file__), 'output.png')
What is utils.py file?
After importing required libraries, lets write some helper functions to process our MNIST model in utils.py file.
## utils.py

from keras.models import model_from_json
from scipy.misc.pilutil import imread, imresize, imshow
import tensorflow as tf
import os

JSONpath = os.path.join(os.path.dirname(__file__), 'models', 'model.json')
MODELpath = os.path.join(os.path.dirname(__file__), 'models', 'mnist.h5')

def init():
    json_file = open(JSONpath, 'r')
    loaded_model_json = json_file.read()
    json_file.close()
    loaded_model = model_from_json(loaded_model_json)
    loaded_model.load_weights(MODELpath)
    print("Loaded Model from disk")
    loaded_model.compile(loss='categorical_crossentropy',
                         optimizer='adam', metrics=['accuracy'])    graph = tf.get_default_graph()

return loaded_model, graph
This file contains init function which basically initializes our MNIST model file saved using Keras. It grabs or model file, loads them and compile them using adam optimizer to make it ready for prediction.
here we are using categorical_crossentropy as our loss function, adam as our optimizer and accuracy as our performance measuring metric.
You can learn how to save model using keras from here.
Continuing views.py
Here we have got another helper function to help us convert our BASE64 Image file: which is grabbed from client side to a PNG file and save it as whatever is in OUTPUT variable; which is save it as output.png file in current directory.
def getI420FromBase64(codec):
    base64_data = re.sub('^data:image/.+;base64,', '', codec)
    byte_data = base64.b64decode(base64_data)
    image_data = BytesIO(byte_data)
    img = Image.open(image_data)
    img.save(OUTPUT)

def convertImage(imgData):
    getI420FromBase64(imgData)
Writing our API
Now lets write our main API to:
- Grab a base64 image file submitted by client
- Convert it into png file
- Process it to be able to fit in our trained model file
- Predict the image using our previous helper function and get performance metric in return
- Return it as a JSON response
@csrf_exempt
def predict(request):

imgData = request.POST.get('img')

convertImage(imgData)
    x = imread(OUTPUT, mode='L')
    x = np.invert(x)
    x = imresize(x, (28, 28))
    x = x.reshape(1, 28, 28, 1)
    with graph.as_default():
        out = model.predict(x)
        print(out)
        print(np.argmax(out, axis=1))
        response = np.array_str(np.argmax(out, axis=1))
        return JsonResponse({"output": response})
It uses csrf_exempt decorator because django is very strict about security. By using it we are just disabling the csrf validation.
Now we have finished writing our application backend code to classify the label of given image.
Provide a route
Now lets provide a route for our main function.
Go to your project folder where settings.py and urls.py files are located.
in settings.py file underneath the INSTALLED_APPS array install the main app which we’ve created earlier to write our functions.
INSTALLED_APPS = [
    'django.contrib.admin',
    'django.contrib.auth',
    'django.contrib.contenttypes',
    'django.contrib.sessions',
    'django.contrib.messages',
    'django.contrib.staticfiles',

    ## our main application
    'main'
]
After that head back to urls.py file and write a route which reaches our predict function.
from django.contrib import admin
from django.urls import path, include
from main.views import predict

urlpatterns = [
    path('', include('main.urls')),
    path('api/predict/', predict)
]
Save everything and now our backend api is ready.
Front End Part
Now it’s time to write our frontend code which enables us to interact with our backend api.
We are using django’s template for writing our fronend.
lets create templates folder inside our main folder and inside that lets create index.html file.
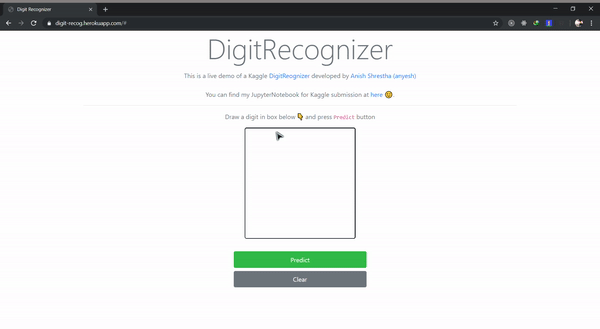
Inside html file lets write some code to create canvas and submit the image drawn by user in that canvas.
<canvas
          id="canvas"
          width="280"
          height="280"
          style="border:2px solid; float: left; border-radius: 5px; cursor: crosshair;"
        ></canvas>

<p id="result" class="text-center text-success"></p>
<a href="#" class="btn btn-success btn-block p-2"  id="predictButton">
            Predict
</a>
<input
        type="button"
        class="btn btn-block btn-secondary p-2"
        id="clearButton"
        value="Clear"
 />
You can design your fronted however you like and create this canvas inside it.
After displaying a canvas, lets make it intractable with some JS(Jquery).
(function()
{
 var canvas = document.querySelector( "#canvas" );
 canvas.width = 280;
 canvas.height = 280;
 var context = canvas.getContext( "2d" );
 var canvastop = canvas.offsetTop

var lastx;
   var lasty;

context.strokeStyle = "#000000";
   context.lineCap = 'round';
   context.lineJoin = 'round';
   context.lineWidth = 5;

function dot(x,y) {
     context.beginPath();
     context.fillStyle = "#000000";
     context.arc(x,y,1,0,Math.PI*2,true);
     context.fill();
     context.stroke();
     context.closePath();
   }

function line(fromx,fromy, tox,toy) {
     context.beginPath();
     context.moveTo(fromx, fromy);
     context.lineTo(tox, toy);
     context.stroke();
     context.closePath();
   }

canvas.ontouchstart = function(event){
     event.preventDefault();

lastx = event.touches[0].clientX;
     lasty = event.touches[0].clientY - canvastop;

dot(lastx,lasty);
   }

canvas.ontouchmove = function(event){
     event.preventDefault();

var newx = event.touches[0].clientX;
     var newy = event.touches[0].clientY - canvastop;

line(lastx,lasty, newx,newy);

lastx = newx;
     lasty = newy;
   }

var Mouse = { x: 0, y: 0 };
 var lastMouse = { x: 0, y: 0 };
 context.fillStyle="white";
 context.fillRect(0,0,canvas.width,canvas.height);
 context.color = "black";
 context.lineWidth = 10;
    context.lineJoin = context.lineCap = 'round';

debug();

canvas.addEventListener( "mousemove", function( e )
 {
  lastMouse.x = Mouse.x;
  lastMouse.y = Mouse.y;

Mouse.x = e.pageX - this.offsetLeft;
  Mouse.y = e.pageY - this.offsetTop;

}, false );

canvas.addEventListener( "mousedown", function( e )
 {
  canvas.addEventListener( "mousemove", onPaint, false );

}, false );

canvas.addEventListener( "mouseup", function()
 {
  canvas.removeEventListener( "mousemove", onPaint, false );}, false );

var onPaint = function()
 {
  context.lineWidth = context.lineWidth;
  context.lineJoin = "round";
  context.lineCap = "round";
  context.strokeStyle = context.color;

context.beginPath();
  context.moveTo( lastMouse.x, lastMouse.y );
  context.lineTo( Mouse.x, Mouse.y );
  context.closePath();
  context.stroke();
 };

function debug()
 {
  /* CLEAR BUTTON */
  var clearButton = $( "#clearButton" );

clearButton.on( "click", function()
  {

context.clearRect( 0, 0, 280, 280 );
    context.fillStyle="white";
    context.fillRect(0,0,canvas.width,canvas.height);

});

/* COLOR SELECTOR */

$( "#colors" ).change(function()
  {
   var color = $( "#colors" ).val();
   context.color = color;
  });

/* LINE WIDTH */

$( "#lineWidth" ).change(function()
  {
   context.lineWidth = $( this ).val();
  });
 }
}());
This is basically our JS function to allow users to draw inside our canvas. It grabs the mouse + touch strokes of the user and draw lines inside canvas according to their drawings.
After that lets write a code to submit those drawn lines to backend as base64 image file.
      $("#predictButton").click(function() {
        var $SCRIPT_ROOT = "/api/predict/";
        var canvasObj = document.getElementById("canvas");
        var context = canvas.getContext( "2d" );
        var img = canvasObj.toDataURL();
        $.ajax({
          type: "POST",
          url: $SCRIPT_ROOT,
          data: { img: img },
          success: function(data) {
            $("#result").text("Predicted Output is: " + data.output);

context.clearRect( 0, 0, 280, 280 );
            context.fillStyle="white";
            context.fillRect(0,0,canvas.width,canvas.height);

}
        });
      });
Here we are using jquery to:
- Listen to our button click event
- Defining our api route path
- Grabbing our canvas element
- Getting the context of the canvas as base64 image
- Submitting it to our backend using ajax request
- Getting response from our backend and displaying it on our output section.
Now for last, lets add route to our fronted and write a function to serve our html file in our main app.
# views.py

def index(request):
    return render(request, 'index.html', {})

# urls.py
from django.urls import path
from .views import index

urlpatterns = [
    path('', index, name="index")
]
Thats it! we have succesfully completed our backend + fronend development to recognize hand written digits.

Now lets deploy it.
Deployment

We are going to use Heroku to deploy our django project because it’s awesome and FREE!
You can learn more about heroku from it’s official documentation page. It is beautiful and everything is well documented.
Install heroku cli in your laptop and lets get started.
To make our django project heroku ready, lets write a Procfile inside our root directory.
# Procfile

web: gunicorn digitrecognizer.wsgi --log-file - --log-level debug
now lets create new app repository in heroku and get the remote url of that app.
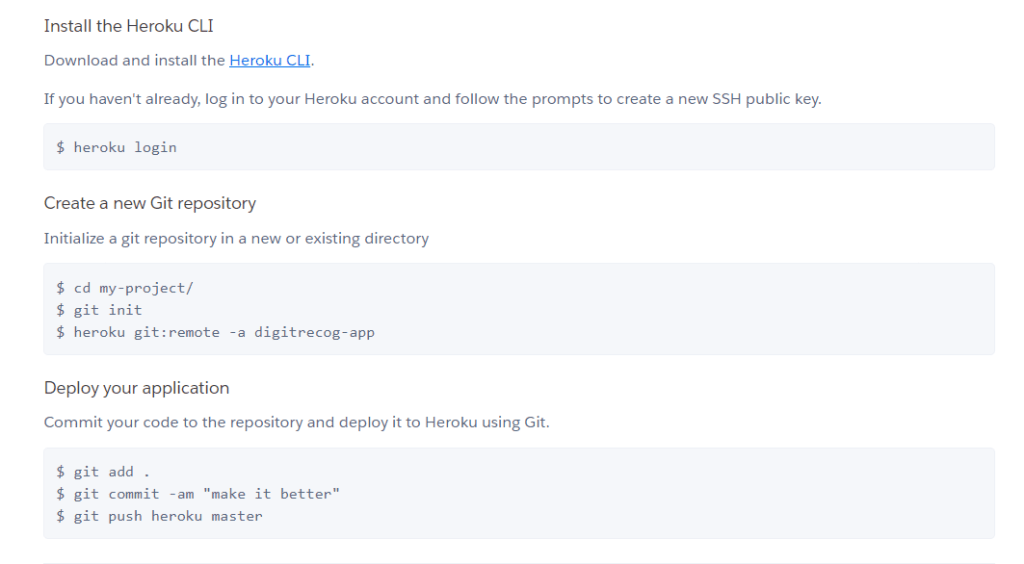
after that git init in our project directory and add git remote url to heroku url and push our project folder to heroku with requirements.txt files included.
That’s it for deployment 😊. We have succesfully deployed our application in cloud and it is live now. You can access the application using url provided by heroku in your app dashboard.
Final Thoughts
It is very important to deploy your projects in live environment to showcase your projects. It will be great for your project portfolio.
I hope you have learned something, try building your own handwritten digit classifier and deploy it on production environment. You can check my demo app from here.
References
[1] Vitor Freitas, How to Deploy Django Applications on Heroku, 2016 Aug 9 [ONLINE]
[2] yann lecunn, MNIST Database, 1998 [ONLINE]
